I noticed a while back that the caulk in our tub was starting to look kind of funky. Like, gross funky. So, being the all-research-and-no-action person that I can be sometimes, I looked up some recipes for how to clean caulk — after, of course, finding dozens of results that said, “Recaulking is cheap and easy! Just redo the caulk!”
Pshaw! Me, recaulk the tub?
Fast-forward to a couple weeks ago, when Aaron (without the benefit of aforementioned research) just straight-up went to town scrubbing the shit out of the already-old caulk.
It was hard and cracking, of course, and started peeling off.
I saw the missing and peeling caulk during my next shower, and realized that we were going to have to recaulk the tub, anyway.
Being the research-first sort of person that I am, I sought out some info about caulking from This Old House, from YouTube in general, and from my buddy Sheryl (who has done her share of minor and not-so-minor home improvement projects over the years). I borrowed, purchased, and assembled my tools and supplies, and embarked on my mission during naptime last Saturday.
Total Time: One Hour
Difficulty Level: Easy
My tools:

- Silicone caulk for bathroom and kitchen
- Caulk gun (borrowed from Sheryl)
- Caulk smoothing tools (also borrowed from Sheryl)
- Lysol wipes
- Utility knife
- Paper towels
I ended up not using the caulk remover tool I also borrowed from Sheryl, in favor of the utility knife. My husband was also thinking ahead and bought a cap for the tube, instead of us sticking a nail in the end like his father used to do.
Before I went upstairs to take care of business (read: while I was waiting for my son to fall asleep for his nap), I practiced a couple of times on an old shoebox lid, like Sheryl had suggested, just so I could get the hang of how a caulk gun works. First time for everything, I suppose. It’s a good thing I did — it showed me how easy it really is to use, and helped me get over the jitters I had about maybe possibly fucking up our bathtub.
Finally, the boy fell asleep, and it was go time.
Step One: remove all the old caulk. This was, by far, the most difficult and time-consuming step of the whole process. Sure, some of it just peeled up on its own, but some of it was still stuck firm. I didn’t use any silicone caulk remover or solvent, but when I eventually have to do this again, I just might. I scraped and poked with our brand new utility knife, scrubbed with the Lysol wipes and the paper towels, and eventually got it all up. I gave the whole joint a good scrubbing with the Lysol wipes to make sure any mildewy nastiness was taken care of, as well.
Step Two: apply the new caulk. One preparatory step that I chose to skip was to use painters’ tape to tape off the top and bottom of the joint. Next time, I may go ahead and do that, and I’ll explain why later (although it may become apparent with my before and after pictures).
The hardest part of applying the caulk, for me, was my shitty hand strength. Sure, there was a bit of a learning curve for figuring out the exact squeezing pressure and the right speed to move the caulk gun to match the pressure — but my hand absolutely ached after caulking the entire front, or back, or half of the long side.
Another challenge was squeeging off the excess with the smoother tools. Again, there was a learning curve, and I would have been perfectly OK with being less than perfect with it, were my tub white instead of blue. As it is, I didn’t want any excess to show on the tub or tile — hence why I’d use the painters’ tape next time. It would mask off the areas that would get excess caulk splooge on them when I smooth out the bead of caulk.
I’m not convinced I’d use the smoother tool again if I used painters’ tape, either. Another quirk of my tub surround is the fact that it’s tile. I looooove having a tile surround instead of the plastic in most places I’ve lived… but using the caulk smoother tool meant that every time I hit a grout divot, I got a divot in my caulk bead. Next time (since caulk does need to be replaced every five to ten years), perhaps I’ll tape it off and use the wet finger method of smoothing it.
I did take a bunch of pictures along the way, but upon looking at them later, I realized that I really don’t need a bunch of pictures of my nasty old caulk online. So, in lieu of a blow-by-blow pictorial, I present a before and after:
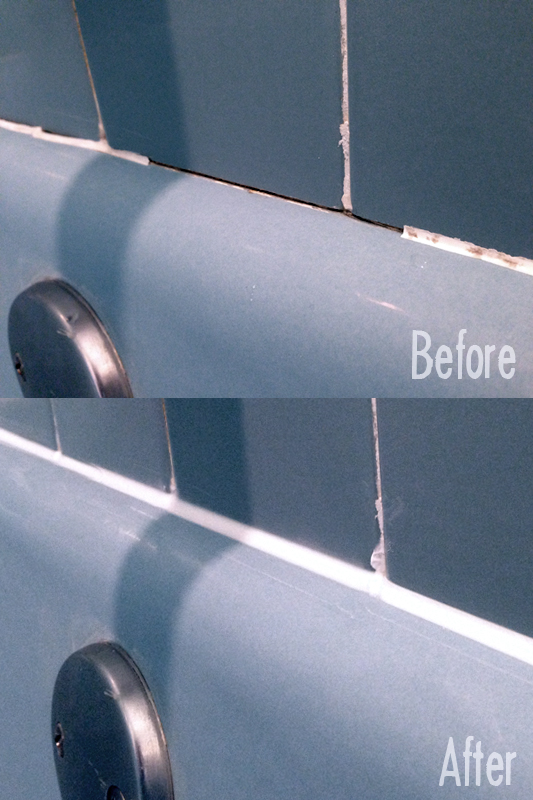
It’s not perfect; I didn’t expect it to be. But it’s good enough, and certainly looks pretty decent for a first try.
I did this around 3pm on a Saturday. The caulk is supposed to cure for 24 hours before getting wet to avoid having it pull away from the tile and let water seep in.
Luckily for us, 20 hours seems to be sufficient, as a certain member of my household totally forgot about the caulk and jumped in the shower half-asleep the next day around noon. I’ve been checking the caulk daily, and it doesn’t seem to have suffered any adverse effects from being showered on.
A++ Would do again instead of paying for a professional.