This was only the second garment I’ve ever sewn (with the first being my Kujiun cosplay skirt from back in ’05… Oh, and also not counting t-shirt surgery attempts). Even though it was very much a learning experience, I’ve gotta say that I’m damn proud of myself for having made something wearable that my son and I both love.
This project was my first attempt at sewing knits, and my first time using my walking (aka even feed) foot. After website after sewing website assured me that knits were nothing to be afraid of, I figured that I’d tackle them early on in my sewing journey, so I wouldn’t have a chance to hype it up and get all weird about it.
Materials:
- dark green knit: back of an oversized travel t-shirt I’d saved for a future t-shirt quilt
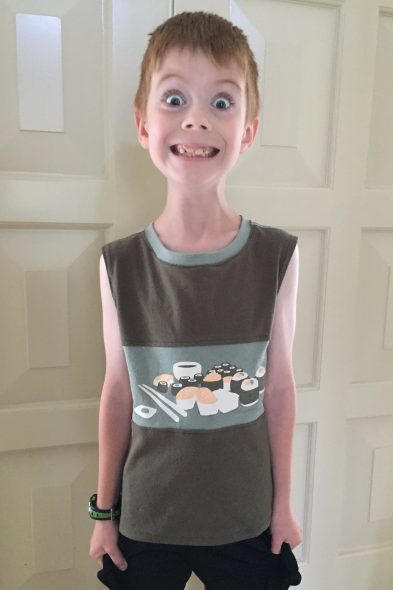
- light green knit with graphic: This shirt that I bought from Threadless back in November 2006 (Incidentally, I paid $10 for this Mens XL tee back then, plus $5.50 shipping. I could get a replacement today in Girly 2X for $22.50 plus $5.75 shipping — and that’s on sale.)
- olive green thread in the Singer Stylist 476
- white thread in the Singer Tiny Serger
- even feed/walking foot
- iron and ironing board
- parchment paper (for my DIY pattern)
- fabric pencil
- rotary cutter
- NEW self-healing cutting mat (woo!)
- lots of pins and my pincushion
- seam ripper
I learned so much this time. Yes, that means I made lots of little mistakes, but I’m not consciously trying to spin it in a positive light. I’m genuinely glad that I learned these things by doing.
Lessons Learned:
A serger can be threaded correctly and incorrectly at the same time. The threads were all going through the right holes, but it wasn’t making a chain. Turns out, not only does everything have to go in the right holes, but it has to do so in the right order, too.
Also, I need to remember not to leave the Singer Tiny Serger threaded and sitting on my sewing table, or the cat will jump up on the table and tangle all the threads.
Speaking of thread: cheap thread can break, especially if you still don’t quite have the hang of threading the sewing machine so that the tension is set just right. Maybe it’s worth it to buy something better than the Amazon bargain-basement thread pack.
“Top stitching” really means top stitching. It doesn’t mean that the bottom side of the stitch is visible on the outside of the garment — it means to stitch on the top of the garment. So, yeah, there’s one ugly bit of supposed top-stitching, but it’s not horrible.
This one is obvious: it’s easy to screw up the steps of assembling a garment, so never assume you know what comes next if you’ve never made this particular pattern before. One of the shoulders is top-stitched on the wrong side of the seam because I sewed around the neck before I top-stitched the shoulder. Again, that didn’t ruin it, but it could look better.
Speaking of not ruining it… Don’t trust one person’s tutorial if you’ve never made this garment before. She might not mention that you always need to use a zig-zag stitch on knits or you’ll pop stitches when your wearer tries his new shirt on. Some stitches did pop, but it was minimal and it doesn’t seem to have ruined the shirt.
Even so, I learned that knits can be forgiving when it comes to measurement. Somehow, I managed to mis-measure the front and back pieces (who, me?), so one part was shorter than the other. I stretched it slightly as I stitched, and it seems to be working out just fine. (Maybe that’s why the side seams didn’t pop?)
This was my first time using a walking foot, and I learned that It Is Awesome. I’m totally using it every time I sew a knit from now on.
The details really make a quality garment. Sure, my shirt looks decent from a distance, but I know that I veered off track at the ends of some of the seams, and I can see where my top-stitching went awry in a couple of spots, and and and. Once I can master all the tiny details and finishing touches, then I’ll feel like I’ve really got this thing down.
Mistakes are (usually) fixable. Granted, it’s nigh on impossible to pick little stitches out of t-shirt fabric, but if you’ve accidentally misjudged the size of the head opening… well, that’s fixable, even if the narrowness of the shirt after seam allowance isn’t so much.
Along those lines: always make a muslin. Whether it’s actually muslin or just cheap fabric, having a practice round will save headaches (like nearly everything I mentioned above) happening with the actual garment — especially when you’re super stoked to make this cool sushi shirt for your kid and you don’t have a backup sushi shirt if you mess up.
I count myself lucky that nothing I screwed up was major enough to keep him from wearing the shirt — at least for a little while. I accidentally made it too small, so it’ll only fit him for another few months at best, but I’m still damned proud of myself.